Introduction to Network Services Orchestrator (NSO) with Ansible
Overview
This lab demonstrates common network automation use cases using a few different approaches of using Ansible and NSO.
-
Ansible - using Ansible playbooks/roles to provision devices. In this lab we perform the following tasks using Ansible
- Introduction to Ansible Inventory / playbook / role concepts
- Enable SSH on IOS-XR device (by running exec commands on the device)
- Configure NTP on IOS-XR, IOS-XE, and NX-OS devices
-
NSO - NSO can provide many of the same capabilities as Ansible, with a slightly different approach as well as provide some additional capabilities. In this lab we will complete the following tasks using NSO.
- Introduction to NSO configuration database, device operations, templates, and compliance reporting
- Import current device configuration (brownfield) into the configuration database (CDB)
- Configure NTP on IOS-XR, IOS-XE, and NX-OS devices
-
Better Together - Explore how combining these two great tools can simplify network automation.
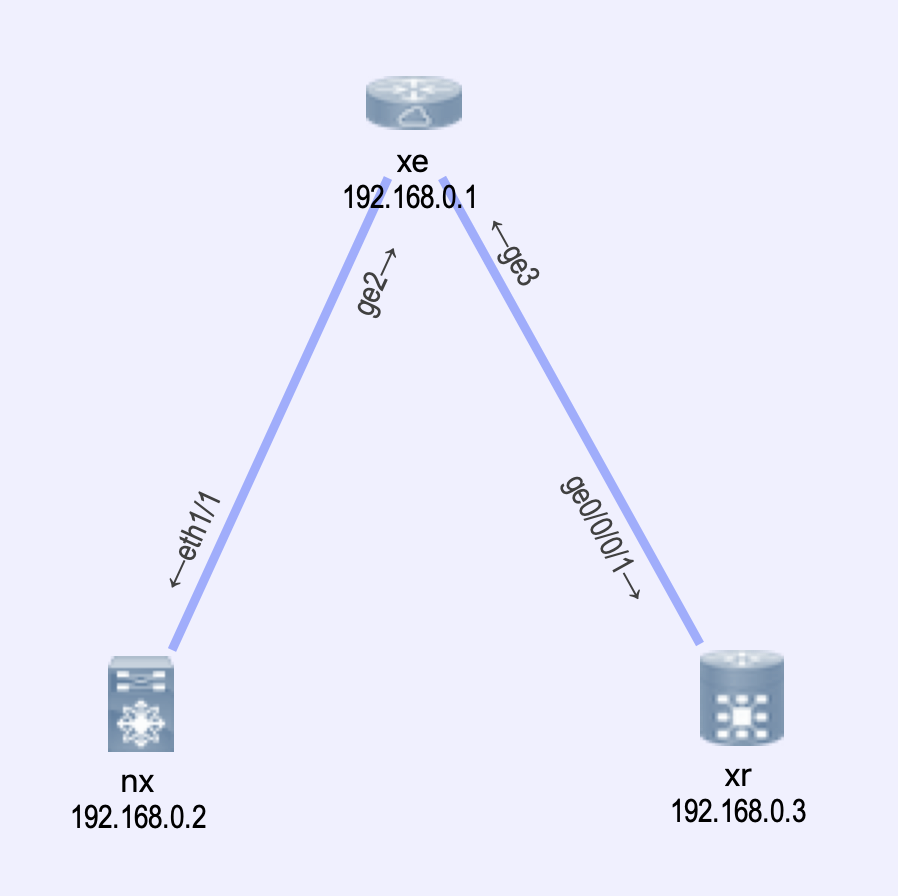
Topology
We will be using virlfiles/xe-xr-nx. However in this lab the topology itself isn't very important. We really just need management access to the devices.
Pre-reqs
!!! danger "You must have the Cisco Devnet sbx_multi_ios sandbox checked out and gone through the sandbox setup" If you are doing this lab at an event (DevNet, Cisco Live, VT, etc) this step may have been completed for you. Check with your proctor for access instructions.
Lab Setup
All steps presented in this guide are written to be completed from the devbox
-
ssh to devbox
ssh developer@10.10.20.20(password C1sco12345) -
Clone required code
git clone https://github.com/DevNetSandbox/sbx_multi_ios
cd sbx_multi_ios/nso-with-ansible
-
Launch lab environment
This may take some time as we are installing some new NSO stuff as well as ansible etc.)
make lab
Makefile while you are waiting to see what all is happening.
You should see output similar to the following
Output
[developer@devbox nso-with-ansible]$make lab
Stopping All Netsim Instances...
confd: no process found
make: [clean-netsim] Error 1 (ignored)
rm: cannot remove ‘README.netsim’: No such file or directory
make: [clean-netsim] Error 1 (ignored)
Stopping NSO...
connection refused (stop)
make: [clean-nso] Error 1 (ignored)
ncsc -c packages/pipe-yaml/yaml-c.cli -o packages/yaml-c.ccl
ncs-setup --dest . --package cisco-ios --package cisco-iosxr --package cisco-nx
export PATH=$PATH:packages/pipe-yaml; echo $PATH; ncs
/opt/nso/bin:/usr/local/bin:/usr/bin:/usr/local/sbin:/usr/sbin:/home/developer/bin:packages/pipe-yaml
Creating default environment from topology.virl
Localizing {{ gateway }} with: 172.16.30.254
Localizing rsa modulus 768 with: rsa modulus 1024
Waiting 10 minutes for nodes to come online....
  [####################################]  100%
virl generate nso --syncfrom
Updating NSO....
Successfully added VIRL devices to NSO

    NSO Sync Report

╒══════════╤══════════╕
│ Device   │ Result   │
╞══════════╪══════════╡
│ nx       │ SUCCESS  │
├──────────┼──────────┤
│ xe       │ SUCCESS  │
├──────────┼──────────┤
│ xr       │ SUCCESS  │
╘══════════╧══════════╛
At this point we have a running VIRL simulation, NSO installed and running, and we're ready to get started.
The last step is for us to be working in the correct virtualenv where we have the proper packages installed.
source venv/bin/activate
If you have multiple sessions, or you disconnect from the devbox, you will need to re-run this command
Output
[developer@devbox nso-with-ansible]$source venv/bin/activate
(venv) [developer@devbox nso-with-ansible]$
Ansible Walkthrough
Inventory
Ansible works against multiple systems in your infrastructure at the same time. It does this by selecting portions of systems listed in Ansible’s inventory, which defaults to being saved in the location /etc/ansible/hosts. You can specify a different inventory file using the -i <path> option on the command line.
Not only is this inventory configurable, but you can also use multiple inventory files at the same time and pull inventory from dynamic services (like NSO) or different file formats (YAML, ini, etc)
For detailed information on Ansible Inventory see here
For our purposes we will use virlutils to generate an inventory suitable for our running simulation, and then move it to our ansible_playbooks directory
virl generate ansible
mv default_inventory.yaml ansible_playbooks/
Output
[developer@devbox nso-with-ansible]$virl generate ansible
Placing xr into ansible group routers
Placing nx into ansible group switches
Placing xe into ansible group routers
Writing default_inventory.yaml
[developer@devbox nso-with-ansible]$mv default_inventory.yaml ansible_playbooks/
Take a look at your default_inventory.yaml (cat ansible_playbooks/default_inventory.yaml) file to see how its built.
Example default_inventory file
all:
  children:
    switches:
      hosts:

        nx:
          ansible_host: 172.16.30.52
          console_server: 10.10.20.160
          console_port: 17001
          ansible_network_os: nxos

    routers:
      hosts:

        xe:
          ansible_host: 172.16.30.53
          console_server: 10.10.20.160
          console_port: 17003
          ansible_network_os: ios

        xr:
          ansible_host: 172.16.30.54
          console_server: 10.10.20.160
          console_port: 17005
          ansible_network_os: iosxr
Device Groups
Device groups are useful for managing a large number of devices, membership in groups can be organized in any number of ways; location, role, type, etc.
Note
- A device can be a member of multiple groups
- Groups can contain other groups
Take a look at your inventory (cat ansible_playbooks/default_inventory.yaml) You can see that the generated file has 3 groups:
- all
- routers
- switches
Playbooks
Ansible uses playbooks to define a set of tasks to complete. These tasks use modules that interface with device and allow various operational/configuration commands to be executed. In the following example we will use the ./ansible_playbooks/enable_ssh.yaml playbook to enable SSH on the device xr using the telnet module.
This is a very simple playbook with a single task in it.
enable_ssh.yaml
---

- hosts: xr
  connection: local
  gather_facts: no
  tasks:
    - name: Generate SSH Key
      telnet:
        user: "{{ lookup('env','ANSIBLE_NET_PASSWORD') }}"
        password: "{{ lookup('env','ANSIBLE_NET_USERNAME') }}"
        login_prompt: "Username: "
        prompts:
          - "[>|#]"
          - ": "
        command:
          - crypto key generate rsa
          - "2048"
ansible-playbook -i ansible_playbooks/default_inventory.yaml ansible_playbooks/enable_ssh.yaml
Output
(venv) [developer@devbox ansible_playbooks]$ansible-playbook -i default_inventory.yaml enable_ssh.yaml

PLAY [xr] ***************************************************************************************************************************

TASK [Generate SSH Key] *************************************************************************************************************
changed: [xr]

PLAY RECAP **************************************************************************************************************************
xr                         : ok=1    changed=1    unreachable=0    failed=0
You can confirm the playbook by attempting to SSH to the IOS-XR device using the following command
The default credentials for the VIRL nodes are cisco/cisco
virl ssh xr
NTP Configuration
Next we will configure NTP on the devices. In this example we will be setting the NTP servers to 1.1.1.1 and 3.3.3.3.
In the following examples with Ansible and NSO we will be altering the NTP configurations to demonstrate how the different tools behave.
configure_ntp.yaml
---

- hosts: all
  connection: network_cli
  gather_facts: no
  vars:
   ansible_ssh_pass: "{{ lookup('env','ANSIBLE_NET_PASSWORD') }}"
   ansible_user: "{{ lookup('env','ANSIBLE_NET_USERNAME') }}"
   desired_ntp_servers:
    - 1.1.1.1
    - 3.3.3.3

  tasks:
   - name: Get current NTP servers
     cli_command:
       command: show run | inc ntp
     register: output

   - set_fact:
      actual_ntp_servers: "{{ output.stdout | parse_cli_textfsm('templates/ios-ntp.textfsm') | map(attribute='SERVER') | list }}"

   - debug:
      var: actual_ntp_servers

   - debug:
      msg: "Add the following: {{ desired_ntp_servers | difference(actual_ntp_servers) | join(',') }}"

   - debug:
      msg: "Remove the following: {{ actual_ntp_servers | difference(desired_ntp_servers) | join(',') }}"

   - name: Add the new servers
     cli_config:
       config: ntp server {{ item }}
     loop: "{{ desired_ntp_servers | difference(actual_ntp_servers) | default([]) }}"

   - name: Remove old servers
     cli_config:
       config: no ntp server {{ item }}
     loop: "{{ actual_ntp_servers | difference(desired_ntp_servers) | default([]) }}"
cd ansible_playbooks
ansible-playbook -i default_inventory.yaml configure_ntp.yaml
Output
# (venv) [developer@devbox ansible_playbooks]$ansible-playbook -i default_inventory.yaml configure_ntp.yaml

PLAY [all] ******************************************************************************************************************************************************************************************************************************************************************************************************************************************************************

TASK [Get current NTP servers] **********************************************************************************************************************************************************************************************************************************************************************************************************************************************
ok: [xe]
ok: [nx]
ok: [xr]


TASK [set_fact] *************************************************************************************************************************************************************************************************************************************************************************************************************************************************************
ok: [nx]
ok: [xr]
ok: [xe]

TASK [debug] ****************************************************************************************************************************************************************************************************************************************************************************************************************************************************************
ok: [xe] => {
    "actual_ntp_servers": []
}
ok: [nx] => {
    "actual_ntp_servers": []
}
ok: [xr] => {
    "actual_ntp_servers": []
}

TASK [debug] ****************************************************************************************************************************************************************************************************************************************************************************************************************************************************************
ok: [xe] => {
    "msg": "Add the following: 1.1.1.1,3.3.3.3"
}
ok: [nx] => {
    "msg": "Add the following: 1.1.1.1,3.3.3.3"
}
ok: [xr] => {
    "msg": "Add the following: 1.1.1.1,3.3.3.3"
}

TASK [debug] ****************************************************************************************************************************************************************************************************************************************************************************************************************************************************************
ok: [nx] => {
    "msg": "Remove the following: "
}
ok: [xe] => {
    "msg": "Remove the following: "
}
ok: [xr] => {
    "msg": "Remove the following: "
}

TASK [Add the new servers] **************************************************************************************************************************************************************************************************************************************************************************************************************************************************
changed: [xe] => (item=1.1.1.1)
changed: [nx] => (item=1.1.1.1)
changed: [xe] => (item=3.3.3.3)
changed: [xr] => (item=1.1.1.1)
changed: [nx] => (item=3.3.3.3)
changed: [xr] => (item=3.3.3.3)

TASK [Remove old servers] ***************************************************************************************************************************************************************************************************************************************************************************************************************************************************

PLAY RECAP ******************************************************************************************************************************************************************************************************************************************************************************************************************************************************************
nx                         : ok=6    changed=1    unreachable=0    failed=0
xe                         : ok=6    changed=1    unreachable=0    failed=0
xr                         : ok=6    changed=1    unreachable=0    failed=0
Note
Since we've changed directories into the ansible_playbooks subdirectory associated virl commands will not work
any longer, to use them we need to change directories back up one level to nso-with-ansible
For fun run the playbook again. You will see that because the way the playbook was written AND how the configuration of NTP exists on the XR device, Ansible believes it needs to reconfigure the NTP servers again.
templates/ios-ntp.textfsm
Value SERVER (\S+)

Start
  ^ntp server ${SERVER} -> Record
XE Config
xe#show run | i ntp
ntp server 1.1.1.1
ntp server 3.3.3.3
XR Config
RP/0/0/CPU0:xr#show run | i ntp
Wed Apr 17 20:01:07.876 UTC
Building configuration...
ntp
RP/0/0/CPU0:xr#show run | b ntp
Wed Apr 17 20:01:26.114 UTC
Building configuration...
ntp
 server 1.1.1.1
 server 3.3.3.3
!
As you see we COULD change our logic to find the NTP servers depending on the OS, such inconsisitencies in OS platforms, needs to be thought out and accounted for in your playbook development.
NSO Walkthrough
We will start out by using the CLI of NSO. The CLI provides a great starting point for Network Engineers who are very comfortable with "c-style" or "j-style" command line interfaces. This CLI represents all of the devices under management with a consistent CLI, while still providing all of the benefits of NSO in terms of transactions, rollbacks, it also provides some handy utilities for generating API payloads as you look to integrate in with other workflows.
Importing devices into NSO
Note
During the initial setup of this lab the VIRL devices were imported into NSO. In doing so, we've already introduced you to one of the features of NSO, which is it's northbound REST API, but we will get to that in a second.
If you want you can skip this section and proceed to NSO Device Groups
NSO maintains a configuration database (CDB) of all the devices and services that it manages. The CDB is a YANG based datastore, and is the source of truth for all things NSO(including NSO itself) Devices can be added to NSO in a variety of ways outlined below.
- Using the NSO CLI
-
Using NSO REST API - this approach is useful for integrating NSO into other tools, such as CMDB/ITSM.
-
Using an Ansible Playbook - Ansible can also consume the nortbound API provided by NSO to perform operations.
Add Network Devices using the NSO CLI
This approach involves using the NSO CLI, this approach should be intuitive for those familiar with network device CLI's.
In this example we are going to add our XE device to NSO. Before we do that we need to obtain its IP address. In this lab the management IP addresses for our network devices are dynamically assigned so we need to use virlutils to collect it. Follow along below:
virl nodes
Output
(venv) [developer@devbox nso-with-ansible]$virl nodes
Here is a list of all the running nodes
╒════════╤═════════════╤═════════╤═════════════╤════════════╤══════════════════════╤════════════════════╕
│ Node   │ Type        │ State   │ Reachable   │ Protocol   │ Management Address   │ External Address   │
╞════════╪═════════════╪═════════╪═════════════╪════════════╪══════════════════════╪════════════════════╡
│ nx     │ NX-OSv 9000 │ ACTIVE  │ REACHABLE   │ telnet     │ 172.16.30.52         │ N/A                │
├────────┼─────────────┼─────────┼─────────────┼────────────┼──────────────────────┼────────────────────┤
│ xe     │ CSR1000v    │ ACTIVE  │ REACHABLE   │ telnet     │ 172.16.30.53         │ N/A                │
├────────┼─────────────┼─────────┼─────────────┼────────────┼──────────────────────┼────────────────────┤
│ xr     │ IOS XRv     │ ACTIVE  │ REACHABLE   │ telnet     │ 172.16.30.54         │ N/A                │
╘════════╧═════════════╧═════════╧═════════════╧════════════╧══════════════════════╧════════════════════╛
As you see our XE device uses the IP 172.16.30.53
IMPORTANT NOTE: IP's are assigned dynamically to the VIRL nodes,
so you need to double check these examples shown below to make sure you are using the correct IP address. The VIRL nodes can be viewed using the virl nodes command.
To the NSO CLI can be accessed via the following command from the NSO server (devbox)
cd ..
ncs_cli -u admin -C
Now, add the device to NSO
config t
devices device xe
address <address>
authgroup virl
device-type cli ned-id cisco-ios
device-type cli protocol telnet
state admin-state unlocked
Output
(venv) [developer@devbox nso-with-ansible]$ncs_cli -u admin -C

admin connected from 192.168.92.1 using ssh on devbox
admin@ncs# config t
Entering configuration mode terminal
admin@ncs(config)# devices device xe
admin@ncs(config-device-xe)# address 172.16.30.53
admin@ncs(config-device-xe)# authgroup virl
admin@ncs(config-device-xe)# device-type cli ned-id cisco-ios
admin@ncs(config-device-xe)# device-type cli protocol telnet
admin@ncs(config-device-xe)# state admin-state unlocked
With NSO the changes made in configuration mode do not take effect immediately, instead they must be committed to the configuration database. Prior to committing you have a chance to preview all of the configuration changes that are staged for commit by performing a commit dry-run
Output
admin@ncs(config-device-xe)# commit dry-run
% No modifications to commit.
As we said before we've already imported the devices for you...so you can see even if we commit this change, nothing will actually happen. Below is an example of what it would look like if we did not already add the device.
Example: commit dry-run
admin@ncs(config-device-xe)# commit dry-run
cli {
    local-node {
        data  devices {
             +    device xe {
             +        address 172.16.30.61;
             +        authgroup virl;
             +        device-type {
             +            cli {
             +                ned-id cisco-ios;
             +                protocol telnet;
             +            }
             +        }
             +        state {
             +            admin-state unlocked;
             +        }
             +    }
              }
    }
}
Once the commit happens, the changes are atomic which means that all of the changes will be made to any/all devices, or no change is made.
In addition to manually entering these CLI commands can be stored in an external script file, and load merged into the configuration of NSO.
We will use the files located in the nso_cli_scripts directory to set some things up and save you some keystrokes.
NSO Device Groups
Like Ansible inventory files, NSO can also leverage device groups. Device groups are useful for managing a large number of devices, membership in groups can be organized in any number of ways; location, role, type, etc.
Note
- A device can be a member of multiple groups.
- Groups can contain other groups
The nso_cli_scripts/create_device_groups.cli script creates groups routers, switches, and all. It then adds xe and xr to the routers group; nx to the switches group; groups router and switches to the all group.
Sample contents of nso_cli_scripts/create_device_groups.cli
devices device-group routers
 device-name [ xe xr ]
!
devices device-group switches
 device-name [ nx ]
!
devices device-group all
 device-group [ routers switches ]
!
If you are not already at the NSO CLI it can be accessed via the following command from the NSO server (devbox)
cd ..
ncs_cli -u admin -C
config t
load merge nso_cli_scripts/create_device_groups.cli
commit dry-run
commit
Output
admin@ncs# config t
Entering configuration mode terminal
admin@ncs(config)# load merge nso_cli_scripts/create_device_groups.cli
Loading.
53 bytes parsed in 0.12 sec (423 bytes/sec)
admin@ncs(config-device-group-all)# commit dry-run
cli {
    local-node {
        data  devices {
             +    device-group all {
             +        device-group [ routers switches ];
             +    }
             +    device-group routers {
             +        device-name [ xe xr ];
             +    }
             +    device-group switches {
             +        device-name [ nx ];
             +    }
              }
    }
}
admin@ncs(config)# commit
The configuration can also be reviewed by running the following command.
exit
show running-config devices device-group
Output
admin@ncs(config)# exit
admin@ncs# show running-config devices device-group
devices device-group all
 device-group [ routers switches ]
!
devices device-group routers
 device-name [ xe xr ]
!
devices device-group switches
 device-name [ nx ]
!
Or converted into structured data via the CLI, this is especially useful for generating API payloads
As XML
admin@ncs# show running-config devices device-group | display xml
<config xmlns="http://tail-f.com/ns/config/1.0">
  <devices xmlns="http://tail-f.com/ns/ncs">
  <device-group>
    <name>all</name>
    <device-group>routers</device-group>
    <device-group>switches</device-group>
  </device-group>
  <device-group>
    <name>routers</name>
    <device-name>xe</device-name>
    <device-name>xr</device-name>
  </device-group>
  <device-group>
    <name>switches</name>
    <device-name>nx</device-name>
  </device-group>
  </devices>
</config>
As JSON
admin@ncs# show running-config devices device-group | display json
{
  "data": {
    "tailf-ncs:devices": {
      "device-group": [
        {
          "name": "all",
          "device-group": ["routers", "switches"]
        },
        {
          "name": "routers",
          "device-name": ["xe", "xr"]
        },
        {
          "name": "switches",
          "device-name": ["nx"]
        }
      ]
    }
  }
}
You can even generate your own pipeCmds as demonstrated using the pipe-yaml package that's included in this repo.
This is super useful when integrating with Ansible!
Example of using pipe-yaml
admin@ncs# show running-config devices device-group | display json | yaml
data:
  tailf-ncs:devices:
    device-group:
    - device-group: [routers, switches]
      name: all
    - device-name: [xe, xr]
      name: routers
    - device-name: [nx]
      name: switches
Device Operations
NSO supports several important operations for reconciling the configuration present in the configuration database (CDB), and the configuration present on the devices. These operations can be applied to all devices, a particular device-group, or a single device.
check-sync - performs a quick check as to whether the device configuration is consistent with the configuration database.
compare-config - allows you to review the differences in the event that a device is out of sync.
sync-from - bring the configuration database into a consistent state with the device
sync-to - bring the device into a consistent state with the configuration database
As with configuration these operations can be triggered via CLI or API. Go ahead and choose a method and do a sync-from.
via CLI
admin@ncs# devices device-group all sync-from
sync-result {
    device nx
    result true
}
sync-result {
    device xe
    result true
}
sync-result {
    device xr
    result true
}
via API
curl -X POST -u admin:admin http://localhost:8080/api/running/devices/device-group/all/_operations/sync-from
Important
Notice the consistency between the CLI operation and the API. This is because both of them are merely representations of the configuration stored in the CDB.
Device Templates
Device templates represent a desired configuration for devices being managed by NSO. They can be used across multiple device types, and compliance reports can be generated with any deviations
The following steps will load some device configuration templates.
Creating Templates
In this lab we have already created a template for you - nso_templates/standard_ntp_template.xml. This template is quite simple, it sets NTP servers to 2.2.2.2 and 4.4.4.4.
standard_ntp_template.xml
<config xmlns="http://tail-f.com/ns/config/1.0">
  <devices xmlns="http://tail-f.com/ns/ncs">
    <template>
      <name>standard_ntp</name>
      <config>
        <ntp xmlns="urn:ios" tags="replace">
          <source>
            <Loopback>0</Loopback>
          </source>
          <server>
            <peer-list>
              <name>2.2.2.2</name>
            </peer-list>
            <peer-list>
              <name>4.4.4.4</name>
            </peer-list>
          </server>
        </ntp>
        <ntp xmlns="http://tail-f.com/ned/cisco-nx" tags="replace">
          <server>
            <id>2.2.2.2</id>
          </server>
          <server>
            <id>4.4.4.4</id>
          </server>
          <source-interface>Loopback0</source-interface>
        </ntp>
        <ntp xmlns="http://tail-f.com/ned/cisco-ios-xr" tags="replace">
          <server>
            <server-list>
              <name>2.2.2.2</name>
            </server-list>
            <server-list>
              <name>4.4.4.4</name>
            </server-list>
          </server>
        </ntp>
      </config>
    </template>
  </devices>
</config>
Each template node e.g ntp can contain a list of configuration for each device-type (NED) that which NSO manages. When templates are applied, NSO automatically handles the logic of applying the appropriate configuration based on the device type. Additionally, tags can be added to templates. A tag is inherited to its sub-nodes until a new tag is introduced.
-
merge with a node if it exists, otherwise create the node. This is the default operation if no operation is explicitly set.
-
replace: configuration within this node on the target device which is not in the template will be automatically removed.
-
create: only apply the configuration if no other configuration of this node applied to the device.
-
nocreate: Only apply the configuration if this node already exists on the device.
You can see in the standard_ntp_template we are using the replace tag.
These template files can be easily created based off existing devices using the conversion mechanisms outlined earlier. e.g show running-config devices device nx config nx:ntp | display xml
Output
admin@ncs# show running-config devices device nx config nx:ntp | display xml
<config xmlns="http://tail-f.com/ns/config/1.0">
<devices xmlns="http://tail-f.com/ns/ncs">
<device>
<name>nx</name>
  <config>
  <ntp xmlns="http://tail-f.com/ned/cisco-nx">
    <server>
      <id>1.1.1.1</id>
      <use-vrf>default</use-vrf>
    </server>
    <server>
      <id>3.3.3.3</id>
      <use-vrf>default</use-vrf>
    </server>
  </ntp>
  </config>
</device>
</devices>
</config>
That should give you enough information to see how the template should be structured for each kind of device.
Let's go ahead and apply the standard_ntp_template.xml.
Launch a CLI session to NSO.
ncs_cli -u admin -C
load merge the CLI script into NSO (you could also type the commands manually if you really wanted to)
conf t
load merge nso_templates/standard_ntp_template.xml
commit dry-run
! review and hit enter to commit
commit
Output from merge
admin@ncs# config t
Entering configuration mode terminal
admin@ncs(config)# load merge nso_templates/standard_ntp_template.xml
Loading.
1.10 KiB parsed in 0.02 sec (37.95 KiB/sec)
admin@ncs(config)# commit dry-run
cli {
    local-node {
        data  devices {
             +    template standard_ntp {
             +        config {
             +            cisco-ios-xr:ntp {
             +                server {
             +                    server-list 2.2.2.2;
             +                    server-list 4.4.4.4;
             +                }
             +            }
             +            nx:ntp {
             +                server 2.2.2.2;
             +                server 4.4.4.4;
             +                source-interface Loopback0;
             +            }
             +            ios:ntp {
             +                source {
             +                    Loopback 0;
             +                }
             +                server {
             +                    peer-list 2.2.2.2;
             +                    peer-list 4.4.4.4;
             +                }
             +            }
             +        }
             +    }
              }
    }
}
admin@ncs(config)# ! review and hit enter to commit
admin@ncs(config)# commit
Commit complete.
At this point NSO has the template, but the devices have not had any configuration changes made to them yet. Before we make changes we are going to look at Compliance Reports.
Compliance Reporting
Compliance Reports can be created to audit device configurations against the template contents. These reports can executed via CLI, or API and the results can be output in text, XML, or HTML formats. For convenience these reports are also hosted on the NSO web server so that they can be linked to from other systems.
Lets run create a report to look at the NTP configuration of the boxs vs the template we just imported.
compliance reports report ntp_audit compare-template standard_ntp all
commit
end
Output
admin@ncs(config)# compliance reports report ntp_audit compare-template standard_ntp all
admin@ncs(config-compare-template-standard_ntp/all)# commit
Commit complete.
admin@ncs(config-compare-template-standard_ntp/all)# end
admin@ncs#
Now that we have created the report we need to run it:
compliance reports report ntp_audit run outformat html
Output
admin@ncs# compliance reports report ntp_audit run outformat html
id 2
compliance-status violations
info Checking 3 devices and no services
location http://localhost:8080/compliance-reports/report_2_admin_1_2019-4-4T23:54:29:0.html
You can use the provided URL to access the report.
Important
You need to change localhost to 10.10.20.20 to view this URL
Credentials:
user: admin
password: admin
Example Report
Publication date : 2019-4-18 12:33:30
Produced by user : admin
Summary
Compliance result titled "" defined by report "ntp_audit"
Resulting in violations
Checking 3 devices and no services
Produced 2019-4-18 12:33:30
From : Oldest available information
To : 2019-4-18 12:33:30
Template discrepancies
standard_ntp
Discrepancies in device
nx
xe
xr
Details
Template discrepancies details
standard_ntp
Device nx
 config {
 nx:ntp {
-        server 1.1.1.1 {
-            use-vrf default;
-        }
+        server 2.2.2.2 {
+        }
-        server 3.3.3.3 {
-            use-vrf default;
-        }
+        server 4.4.4.4 {
+        }
+        source-interface Loopback0;
 }
}
Device xe
 config {
 ios:ntp {
     source {
+            Loopback 0;
     }
     server {
-            peer-list 1.1.1.1 {
-            }
+            peer-list 2.2.2.2 {
+            }
-            peer-list 3.3.3.3 {
-            }
+            peer-list 4.4.4.4 {
+            }
     }
 }
}
Device xr
 config {
 cisco-ios-xr:ntp {
     server {
-            server-list 1.1.1.1 {
-            }
+            server-list 2.2.2.2 {
+            }
-            server-list 3.3.3.3 {
-            }
+            server-list 4.4.4.4 {
+            }
     }
 }
}
As you see, the devices are not in compliance with the template. The report shows which servers will need to be added and which will need to be removed to bring the devices into compliance. In this lab, you can see that we are removing the
NTP servers previously added by Ansible as a result of the replace tag being used in our template.
Applying Templates
As with configurations and operations, Templates can be triggered via CLI or API. Let's go ahead and apply via CLI and do a commit dry-run.
conf t
devices device-group all apply-template template-name standard_ntp
commit dry-run
Output
# admin@ncs# config t
Entering configuration mode terminal
# admin@ncs(config)# devices device-group all apply-template template-name standard_ntp
apply-template-result {
    device nx
    result ok
}
apply-template-result {
    device xe
    result ok
}
apply-template-result {
    device xr
    result ok
}
# admin@ncs(config)# commit dry-run

<any required changes as computed by NSO will be displayed here>

# admin@ncs(config)#
# admin@ncs(config)# commit
Again, you can see what servers will be added or removed after the template is applied and commited. Let's go ahead and commit the changes.
commit
Transactions and Rollbacks
As was mentioned earlier, everything in NSO is a transaction, and in addition to being atomic. They also give the ability rollback any configuration that was changed during that transaction.
Go ahead and do a rollback of the config and do a commit dry-run
rollback configuration
commit dry-run
Example Rollback Output
admin@ncs(config)# rollback configuration
admin@ncs(config)# commit dry-run

< automatically generated backout configuration >

admin@ncs(config)#end
After loading the rollback configuration, another commit (which could subsequently be rolled back as well) is performed.
At this point we can exit NSO.
# admin@ncs(config)# exit
Uncommitted changes found, commit them? [yes/no/CANCEL] no
Commit complete.
# admin@ncs# exit
Introduction to Ansible Modules for NSO.
As highlighted earlier, NSO provides northbound API's for use with integrating with other tools and systems. Integrating NSO with Ansible can become a force multiplier in cross-domain orchestration.
- Playbooks can be decoupled from low level device modules, and instead use common modules across all device types, which can interact with the CDB, or provide other operations.
- Ansible can take advantage of the transaction/rollback capabilities of NSO.
- Ansible can provide workflow to multi step operations.
- NSO can compute required changes on the fly and provide compliance reporting.
The first playbook we'll be running is a basic task; doing a sync-from to pull the devices' configurations into NSO.
We will be using ansible_playbooks/sync_from_devices.yaml. We'll run this locally on the devbox running NSO, so we do not need to feed in an inventory file.
sync_from_devices.yaml
- name: Synchronization of Devices
  hosts: localhost
  connection: local
  gather_facts: no

  tasks:
    - name: NSO sync-from action
      nso_action:
        url: "http://localhost:8080/jsonrpc"
        username: "admin"
        password: "admin"
        path: /ncs:devices/sync-from
        input: {}
cd ansible_playbooks/
ansible-playbook sync_from_devices.yaml
Output
(venv) [developer@devbox nso-with-ansible]$cd ansible_playbooks/
venv) [developer@devbox ansible_playbooks]$ansible-playbook sync_from_devices.yaml
 [WARNING]: Unable to parse /etc/ansible/hosts as an inventory source

 [WARNING]: No inventory was parsed, only implicit localhost is available

 [WARNING]: provided hosts list is empty, only localhost is available. Note that the implicit localhost does not match 'all'


PLAY [Synchronization of Devices] *********************************************************************


TASK [NSO sync-from action] *********************************************************************
changed: [localhost]

PLAY RECAP *********************************************************************
localhost                  : ok=1    changed=1    unreachable=0    failed=0
More Better Together!
Let's explore this in the next section, using a slighting different use-case, as well as introducing how network services can be developed to quit your needs.
Continue on to Part 2